在上一篇《使用IntelliJ IDEA开发SpringMVC网站(二)框架配置》文章中我们使用Spring MVC搭建了一个简单的框架,本文我们来看看如何在Spring MVC上加上对Freemarker的集成。
因为JSP页面允许在JSP中书写Java代码,这是不提倡的(破坏了MVC结构),我们曾经的一个项目中JSP页面中书写的大量的Java代码,导致了代码可读性不好,调试困难,而Freemarker强制了后台代码与页面代码的分离,所以我们后面再做项目时选择了FreeMarker替代JSP。使用了一段时间后觉得Freemarker真的很不错,宏的定义,强大的标签语言让我们爱不释手。(在Java语言中常用的模板引擎除了Freeamrker还有Velocity)
Freemarker 与 JSP
Freemarker与JSP的渲染机制不一样,JSP最终会编译成Java类,JSP文件实际上执行的是JSP对应的Java类,简单地说就是将JSP的HTML转换成out.write输出,而JSP中的Java代码直接复制到翻译后的Java类中。最终执行的是翻译后的Java类,而Freemarker是由Freemarker引擎解释执行的,它们有如下区别:
- 执行方式不一样:JSP是编译执行,而FreeMarker是解释执行。如果JSP文件被修改了,那么对应的Java类也会被重新编译,而Freemarker却不需要。
- 执行效率不同:从两者的执行方式不同可以看出,它们的执行效率不一样,从理论上来说,编译执行的效率明显好于解释执行,一个很明显的例子是在JSP中方法调用是直接执行的,而Freemarker的方法调用是反射执行的,JSP的效率会明显好于Freemarker。当然如果在JSP中有语法JSTL,语法标签的执行要看该标签的实现复杂度。
- 需要的环境支持不一样:JSP执行必须要有Servlet的运行环境,也就是需要ServletContext、HttpServletRequest、HttpServletResponse类,而要渲染Freemarker不需要其他环境类的支持,所以Freemarker不只应用在Servlet环境。
下面我们就来看看如何在Spring MVC中使用Freemarker作为其视图实现。
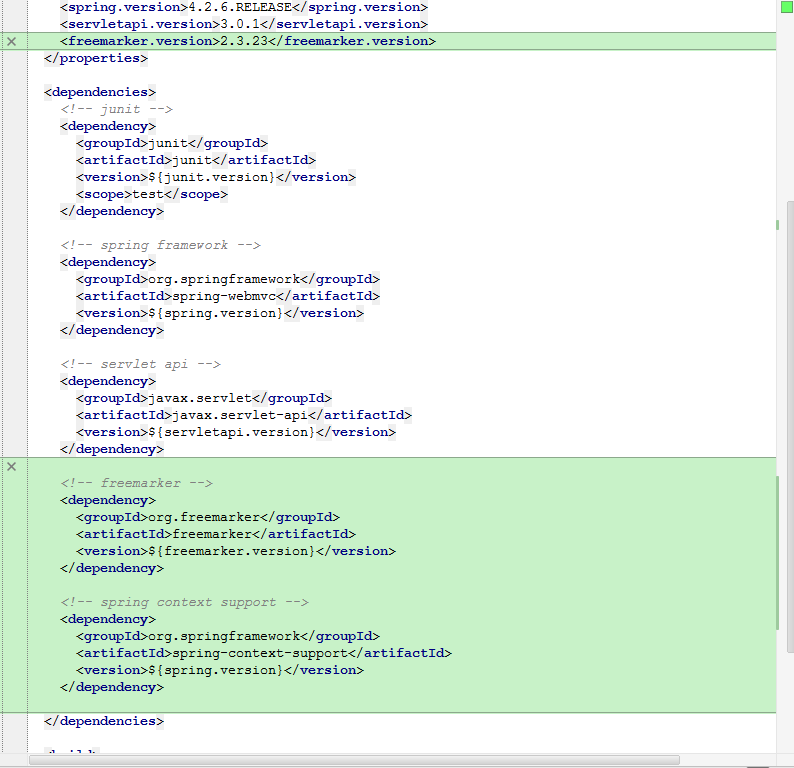
首先,我们需要导入需要的Jar包:FreeMarker和Spring context support,修改pom.xml文件:
Jar包添加好之后,然后在mvc-dispatcher-servlet.xml文件里面增加FreeMarker的配置,如下所示:1
2
3
4
5
6
7
8
9
10
11
12
13
14
15<!-- Freemarker configuration -->
<bean id="freemarkerConfigurer"
class="org.springframework.web.servlet.view.freemarker.FreeMarkerConfigurer">
<property name="templateLoaderPath" value="/WEB-INF/views/" />
<property name="defaultEncoding" value="UTF-8" />
<property name="freemarkerSettings">
<props>
<prop key="locale">zh_CN</prop>
<prop key="datetime_format">yyyy-MM-dd HH:mm:ss</prop>
<prop key="date_format">yyyy-MM-dd</prop>
<prop key="number_format">#.##</prop>
<prop key="classic_compatible">true</prop>
</props>
</property>
</bean>
然后修改View Resolver配置为FreemarkerViewResolver1
2
3
4
5
6
7
8
9
10
11
12
13<!-- View Resolver -->
<bean id="freeMarkerViewResolver" class="org.springframework.web.servlet.view.freemarker.FreeMarkerViewResolver">
<property name="viewClass" value="org.springframework.web.servlet.view.freemarker.FreeMarkerView "/>
<property name="contentType" value="text/html;charset=UTF-8"/>
<property name="cache" value="true"/>
<property name="suffix" value=".ftl"/>
<property name="order" value="1"/>
<property name="exposeRequestAttributes" value="true"/>
<property name="exposeSessionAttributes" value="true"/>
<property name="exposeSpringMacroHelpers" value="true"/>
<property name="allowSessionOverride" value="true"/>
<property name="requestContextAttribute" value="requestContext"/>
</bean>
注意1:在freemarkerConfigurer配置了templateLoaderPath,在freeMarkerViewResolver中不需要再配置prefix,否则启动的时候会报错。如下所示:
注意2:增加了FreeMarker相关配置后,感觉mvc-dispatcher-servlet.xml这个名字不是很合适了,这里把web.xml里面配置的DispatcherServlet的servlet-name名字修改为springmvc,如下所示: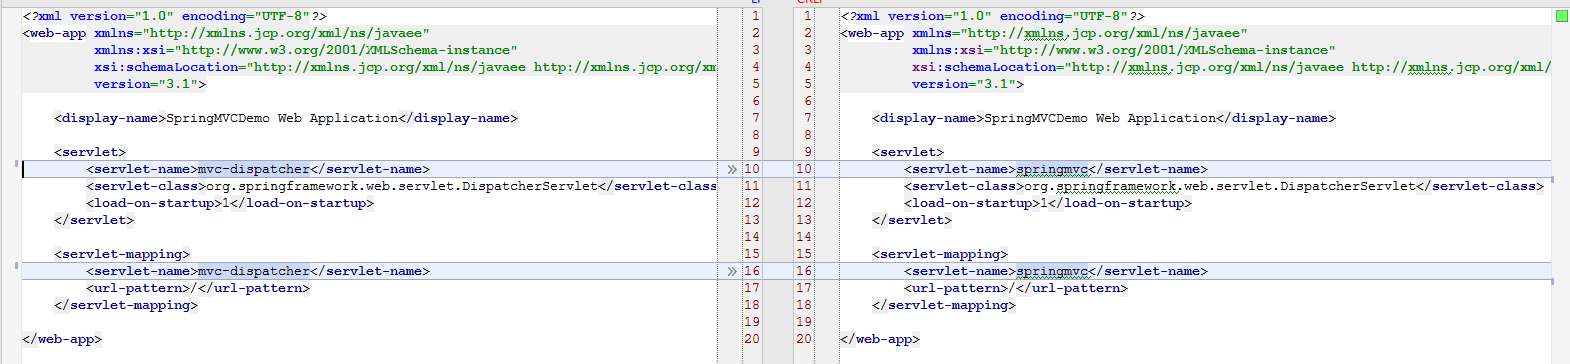
然后在/WEB-INF/目录下新建一个Spring Config文件springmvc-servlet.xml, 将mvc-dispatcher-servlet.xml 内容拷贝到springmvc-servlet.xml文件后,删除原来的 mvc-dispatcher-servlet.xml文件。
完成后的springmvc-servlet.xml文件如下所示:1
2
3
4
5
6
7
8
9
10
11
12
13
14
15
16
17
18
19
20
21
22
23
24
25
26
27
28
29
30
31
32
33
34
35
36
37
38
39
40
41
42
43
44
45
46
47
48
49
50<?xml version="1.0" encoding="UTF-8"?>
<beans xmlns="http://www.springframework.org/schema/beans"
xmlns:xsi="http://www.w3.org/2001/XMLSchema-instance"
xmlns:mvc="http://www.springframework.org/schema/mvc"
xmlns:context="http://www.springframework.org/schema/context"
xsi:schemaLocation="http://www.springframework.org/schema/mvc http://www.springframework.org/schema/mvc/spring-mvc.xsd
http://www.springframework.org/schema/beans
http://www.springframework.org/schema/beans/spring-beans.xsd
http://www.springframework.org/schema/context http://www.springframework.org/schema/context/spring-context.xsd">
<!-- Processing requests for static resources -->
<mvc:resources mapping="/resources/**" location="/resources/" />
<!-- Using Spring MVC provides annotation-driven feature -->
<mvc:annotation-driven />
<!-- Spring Auto scanning components -->
<context:component-scan base-package="com.springmvcdemo" />
<!-- Freemarker configuration -->
<bean id="freemarkerConfigurer"
 class="org.springframework.web.servlet.view.freemarker.FreeMarkerConfigurer">
  <property name="templateLoaderPath" value="/WEB-INF/views/" />
  <property name="defaultEncoding" value="UTF-8" />
  <property name="freemarkerSettings">
		 <props>
			<prop key="locale">zh_CN</prop>
			<prop key="datetime_format">yyyy-MM-dd HH:mm:ss</prop>
			<prop key="date_format">yyyy-MM-dd</prop>
			<prop key="number_format">#.##</prop>
			<prop key="classic_compatible">true</prop>
		 </props>
  </property>
</bean>
<!-- View Resolver -->
<bean id="freeMarkerViewResolver" class="org.springframework.web.servlet.view.freemarker.FreeMarkerViewResolver">
  <property name="viewClass" value="org.springframework.web.servlet.view.freemarker.FreeMarkerView "/>
  <property name="contentType" value="text/html;charset=UTF-8"/>
  <property name="cache" value="true"/>
  <property name="suffix" value=".ftl"/>
  <property name="order" value="1"/>
  <property name="exposeRequestAttributes" value="true"/>
  <property name="exposeSessionAttributes" value="true"/>
  <property name="exposeSpringMacroHelpers" value="true"/>
  <property name="allowSessionOverride" value="true"/>
  <property name="requestContextAttribute" value="requestContext"/>
</bean>
</beans>
配置完成后,我们来进行测试,在 /WEB-INF/views 目录下删除原来的home.jsp页面,新建一个home.ftl页面,home.ftl页面内容如下:1
2
3
4
5
6
7
8
9
10
11
12
13
14 <!-- 使用 HTML5 doctype,不区分大小写 -->
<html lang="zh-cmn-Hans"> <!-- 更加标准的 lang 属性写法 -->
<head>
<!-- 声明文档使用的字符编码 -->
<meta charset='utf-8'>
<!-- 优先使用 IE 最新版本和 Chrome -->
<meta http-equiv="X-UA-Compatible" content="IE=edge,chrome=1"/>
<title></title>
</head>
<body>
this is the home page(ftl). ${message}
</body>
启动Tomcat服务,服务自动成功后,自动弹出系统首页,如下所示:

至此,使用FreeMarker作为Spring MVC视图实现完成。