jasonli822的博客

Java、Android Notes


  • 首页

  • 归档

  • 公益404

Spring Boot+MyBatis+MySql+Sharding-JDBC实现分库分表学习Demo

发表于 2018-05-10

Sharding-JDBC 简介

官网介绍:Sharding-JDBC是一个开源的分布式数据库中间件,它无需额外部署和依赖,完全兼容JDBC和各种ORM框架。Sharding-JDBC作为面向开发的微服务云原生基础类库,完整实现了分库分表、读写分离和分布式主键功能,并初步实现了柔性事务。
本文参考官方Demo采用Spring Boot+MyBatis+MySql+Sharding-JDBC实现分库分表示例。

建库、建表sql

1
2
3
4
5
6
7
8
9
10
11
12
13
14
15

-- 两个库 demo_ds_0、demo_ds_1, 包含两个表:t_order_0、t_order_1

-- 建库SQL如下:
DROP SCHEMA IF EXISTS demo_ds_0;
DROP SCHEMA IF EXISTS demo_ds_1;
CREATE SCHEMA IF NOT EXISTS demo_ds_0;
CREATE SCHEMA IF NOT EXISTS demo_ds_1;

-- 建表SQL如下:
CREATE TABLE IF NOT EXISTS t_order_0 (order_id BIGINT AUTO_INCREMENT, user_id INT NOT NULL, status VARCHAR(50), PRIMARY KEY (order_id));
CREATE TABLE IF NOT EXISTS t_order_item_0 (order_item_id BIGINT AUTO_INCREMENT, order_id BIGINT, user_id INT NOT NULL, status VARCHAR(50), PRIMARY KEY (order_item_id));

CREATE TABLE IF NOT EXISTS t_order_1 (order_id BIGINT AUTO_INCREMENT, user_id INT NOT NULL, status VARCHAR(50), PRIMARY KEY (order_id));
CREATE TABLE IF NOT EXISTS t_order_item_1 (order_item_id BIGINT AUTO_INCREMENT, order_id BIGINT, user_id INT NOT NULL, status VARCHAR(50), PRIMARY KEY (order_item_id));

pom文件

1
2
3
4
5
6
7
8
9
10
11
12
13
14
15
16
17
18
19
20
21
22
23
24
25
26
27
28
29
30
31
32
33
34
35
36
37
38
39
40
41
42
43
44
45
46
47
48
49
50
51
52
53
54
55
56
57
58
59
60
61
62
63
64
65
66
67
68
69
70
71
72
73
74
75
76
77
78
79
<?xml version="1.0" encoding="UTF-8"?>
<project xmlns="http://maven.apache.org/POM/4.0.0" xmlns:xsi="http://www.w3.org/2001/XMLSchema-instance"
xsi:schemaLocation="http://maven.apache.org/POM/4.0.0 http://maven.apache.org/xsd/maven-4.0.0.xsd">
<modelVersion>4.0.0</modelVersion>

<groupId>io.shardingjdbc.example.spring.boot.mybatis</groupId>
<artifactId>sharding-jdbc-demo</artifactId>
<version>0.0.1-SNAPSHOT</version>
<packaging>jar</packaging>

<name>sharding-jdbc-demo</name>
<description>Demo project for Spring Boot</description>

<parent>
<groupId>org.springframework.boot</groupId>
<artifactId>spring-boot-starter-parent</artifactId>
<version>1.5.13.RELEASE</version>
<relativePath/> <!-- lookup parent from repository -->
</parent>

<properties>
<project.build.sourceEncoding>UTF-8</project.build.sourceEncoding>
<project.reporting.outputEncoding>UTF-8</project.reporting.outputEncoding>
<java.version>1.8</java.version>
</properties>

<dependencies>
<dependency>
<groupId>org.springframework.boot</groupId>
<artifactId>spring-boot-starter</artifactId>
</dependency>

<dependency>
<groupId>org.springframework.boot</groupId>
<artifactId>spring-boot-starter-web</artifactId>
<version>1.5.7.RELEASE</version>
</dependency>

<dependency>
<groupId>io.shardingjdbc</groupId>
<artifactId>sharding-jdbc-core-spring-boot-starter</artifactId>
<version>2.0.3</version>
</dependency>

<dependency>
<groupId>org.mybatis.spring.boot</groupId>
<artifactId>mybatis-spring-boot-starter</artifactId>
<version>1.3.0</version>
</dependency>

<dependency>
<groupId>commons-dbcp</groupId>
<artifactId>commons-dbcp</artifactId>
<version>1.4</version>
</dependency>

<dependency>
<groupId>mysql</groupId>
<artifactId>mysql-connector-java</artifactId>
<version>5.1.30</version>
</dependency>

<dependency>
<groupId>org.springframework.boot</groupId>
<artifactId>spring-boot-starter-test</artifactId>
<scope>test</scope>
</dependency>
</dependencies>

<build>
<plugins>
<plugin>
<groupId>org.springframework.boot</groupId>
<artifactId>spring-boot-maven-plugin</artifactId>
</plugin>
</plugins>
</build>

</project>

分库分表最主要有几个配置:
1.有多少个数据源
2.每张表的逻辑表名和所有物理表名
3.用什么列进行分库以及分库算法
4.用什么列进行分表以及分表算法
分为两个库:demo_ds_0、demo_ds_1
每个库都包含四个表:to_order_0, t_order_1, t_order_item_0, t_order_item_1
使用user_id作为分库列;
使用order_id作为分表列;

配置文件 application.properties

1
2
3
4
5
6
7
8
9
10
11
12
13
14
15
16
17
18
19
20
21
22
23
24
25
26
27
28
29
30
31
32
sharding.jdbc.datasource.names=ds_0,ds_1

sharding.jdbc.datasource.ds_0.type=org.apache.commons.dbcp.BasicDataSource
sharding.jdbc.datasource.ds_0.driver-class-name=com.mysql.jdbc.Driver
sharding.jdbc.datasource.ds_0.url=jdbc:mysql://localhost:3306/demo_ds_0
sharding.jdbc.datasource.ds_0.username=root
sharding.jdbc.datasource.ds_0.password=123456

sharding.jdbc.datasource.ds_1.type=org.apache.commons.dbcp.BasicDataSource
sharding.jdbc.datasource.ds_1.driver-class-name=com.mysql.jdbc.Driver
sharding.jdbc.datasource.ds_1.url=jdbc:mysql://localhost:3306/demo_ds_1
sharding.jdbc.datasource.ds_1.username=root
sharding.jdbc.datasource.ds_1.password=123456

sharding.jdbc.config.sharding.default-database-strategy.inline.sharding-column=user_id
sharding.jdbc.config.sharding.default-database-strategy.inline.algorithm-expression=ds_${user_id % 2}

sharding.jdbc.config.sharding.tables.t_order.actual-data-nodes=ds_${0..1}.t_order_${0..1}
sharding.jdbc.config.sharding.tables.t_order.table-strategy.inline.sharding-column=order_id
sharding.jdbc.config.sharding.tables.t_order.table-strategy.inline.algorithm-expression=t_order_${order_id % 2}
sharding.jdbc.config.sharding.tables.t_order.key-generator-column-name=order_id
sharding.jdbc.config.sharding.tables.t_order_item.actual-data-nodes=ds_${0..1}.t_order_item_${0..1}
sharding.jdbc.config.sharding.tables.t_order_item.table-strategy.inline.sharding-column=order_id
sharding.jdbc.config.sharding.tables.t_order_item.table-strategy.inline.algorithm-expression=t_order_item_${order_id % 2}
sharding.jdbc.config.sharding.tables.t_order_item.key-generator-column-name=order_item_id


mybatis.config-location=classpath:META-INF/mybatis-config.xml

logging.level.org.springframework=WARN
logging.level.com.spring.ibatis.UserMapper=DEBUG
logging.file=logs/spring-boot-logging.log

上面配置的分库分表规则如下:
demo_ds_0
├── t_order_0 user_id为偶数 order_id为偶数
├── t_order_1 user_id为偶数 order_id为奇数
├── t_order_item_0 user_id为偶数 order_id为偶数
└── t_order_item_1 user_id为偶数 order_id为奇数
demo_ds_1
├── t_order_0 user_id为奇数 order_id为偶数
├── t_order_1 user_id为奇数 order_id为奇数
├── t_order_item_0 user_id为奇数 order_id为偶数
└── t_order_item_1 user_id为奇数 order_id为奇数

Application

1
2
3
4
5
6
7
@SpringBootApplication
public class ShardingJdbcDemoApplication {

public static void main(String[] args) {
SpringApplication.run(ShardingJdbcDemoApplication.class, args);
}
}

Entity实体类定义

1
2
3
4
5
6
7
8
9
10
11
12
13
14
15
16
17
18
19
20
21
22
23
24
25
26
27
28
29
30
31
32
33
34
35
36
37
38
39
package io.shardingjdbc.example.spring.boot.mybatis.entity;

public final class Order {

private long orderId;

private int userId;

private String status;

public long getOrderId() {
return orderId;
}

public void setOrderId(final long orderId) {
this.orderId = orderId;
}

public int getUserId() {
return userId;
}

public void setUserId(final int userId) {
this.userId = userId;
}

public String getStatus() {
return status;
}

public void setStatus(final String status) {
this.status = status;
}

@Override
public String toString() {
return String.format("order_id: %s, user_id: %s, status: %s", orderId, userId, status);
}
}
1
2
3
4
5
6
7
8
9
10
11
12
13
14
15
16
17
18
19
20
21
22
23
24
25
26
27
28
29
30
31
32
33
34
35
36
37
38
39
40
41
42
43
44
45
46
47
48
49
package io.shardingjdbc.example.spring.boot.mybatis.entity;

public final class OrderItem {

private long orderItemId;

private long orderId;

private int userId;

private String status;

public long getOrderItemId() {
return orderItemId;
}

public void setOrderItemId(final long orderItemId) {
this.orderItemId = orderItemId;
}

public long getOrderId() {
return orderId;
}

public void setOrderId(final long orderId) {
this.orderId = orderId;
}

public int getUserId() {
return userId;
}

public void setUserId(final int userId) {
this.userId = userId;
}

public String getStatus() {
return status;
}

public void setStatus(final String status) {
this.status = status;
}

@Override
public String toString() {
return String.format("item_id:%s, order_id: %s, user_id: %s, status: %s", orderItemId, orderId, userId, status);
}
}

Mapper层

1
2
3
4
5
6
7
8
9
10
11
package io.shardingjdbc.example.spring.boot.mybatis.repository;

import io.shardingjdbc.example.spring.boot.mybatis.entity.Order;
import org.apache.ibatis.annotations.Mapper;

@Mapper
public interface OrderRepository {

Long insert(Order model);

}
1
2
3
4
5
6
7
8
9
10
11
12
13
package io.shardingjdbc.example.spring.boot.mybatis.repository;

import io.shardingjdbc.example.spring.boot.mybatis.entity.OrderItem;
import org.apache.ibatis.annotations.Mapper;

import java.util.List;

@Mapper
public interface OrderItemRepository {

Long insert(OrderItem model);

}
1
2
3
4
5
6
7
8
9
10
11
12
13
14
15
<?xml version="1.0" encoding="UTF-8" ?>
<!DOCTYPE mapper PUBLIC "-//mybatis.org//DTD Mapper 3.0//EN" "http://mybatis.org/dtd/mybatis-3-mapper.dtd">
<mapper namespace="io.shardingjdbc.example.spring.boot.mybatis.repository.OrderRepository">

<insert id="insert" useGeneratedKeys="true" keyProperty="orderId">
INSERT INTO t_order (
user_id, status
)
VALUES (
#{userId,jdbcType=INTEGER},
#{status,jdbcType=VARCHAR}
)
</insert>

</mapper>
1
2
3
4
5
6
7
8
9
10
11
12
13
14
15
16
<?xml version="1.0" encoding="UTF-8" ?>
<!DOCTYPE mapper PUBLIC "-//mybatis.org//DTD Mapper 3.0//EN" "http://mybatis.org/dtd/mybatis-3-mapper.dtd">
<mapper namespace="io.shardingjdbc.example.spring.boot.mybatis.repository.OrderItemRepository">

<insert id="insert" useGeneratedKeys="true" keyProperty="orderItemId">
INSERT INTO t_order_item (
order_id, user_id, status
)
VALUES (
#{orderId,jdbcType=INTEGER},
#{userId,jdbcType=INTEGER},
#{status,jdbcType=VARCHAR}
)
</insert>

</mapper>

MyBatis 配置文件

1
2
3
4
5
6
7
8
9
10
11
12
13
<?xml version="1.0" encoding="UTF-8" ?>
<!DOCTYPE configuration
PUBLIC "-//mybatis.org//DTD Config 3.0//EN"
"http://mybatis.org/dtd/mybatis-3-config.dtd">
<configuration>
<typeAliases>
<package name="io.shardingjdbc.example.spring.boot.mybatis.entity"/>
</typeAliases>
<mappers>
<mapper resource="META-INF/mappers/OrderMapper.xml"/>
<mapper resource="META-INF/mappers/OrderItemMapper.xml"/>
</mappers>
</configuration>

service 层

1
2
3
4
5
6
7
8
9
10
11
12
13
14
15
16
17
18
19
20
21
22
23
24
25
26
27
28
29
30
31
32
33
34
35
36
37
package io.shardingjdbc.example.spring.boot.mybatis.service;

import io.shardingjdbc.example.spring.boot.mybatis.entity.Order;
import io.shardingjdbc.example.spring.boot.mybatis.entity.OrderItem;
import io.shardingjdbc.example.spring.boot.mybatis.repository.OrderItemRepository;
import io.shardingjdbc.example.spring.boot.mybatis.repository.OrderRepository;
import org.springframework.stereotype.Service;

import javax.annotation.Resource;
import java.util.ArrayList;
import java.util.List;

@Service
public class DemoService {

@Resource
private OrderRepository orderRepository;

@Resource
private OrderItemRepository orderItemRepository;

public String insert(Integer userId) {
Order order = new Order();
order.setUserId(userId);
order.setStatus("INSERT_TEST");
orderRepository.insert(order);

long orderId = order.getOrderId();
OrderItem item = new OrderItem();
item.setOrderId(orderId);
item.setUserId(userId);
item.setStatus("INSERT_TEST");
orderItemRepository.insert(item);

return orderId + "|" + item.getOrderItemId();
}
}

返回生成的order_id和order_item_id

Controller层

1
2
3
4
5
6
7
8
9
10
11
12
@RestController
@RequestMapping(value = "/order")
public class TestController {

@Autowired
private DemoService demoService;

@PostMapping
public String insertOrder(Integer userId) {
return demoService.insert(userId);
}
}

使用Postman进行测试

启动服务,使用Postman进行测试:

image

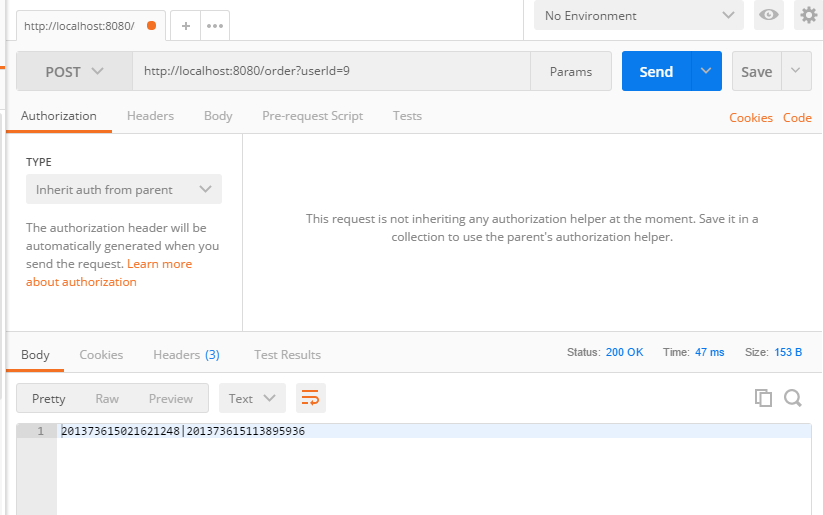
userId从1到9依次插入9条记录,执行结果如下:

image

image

image

image

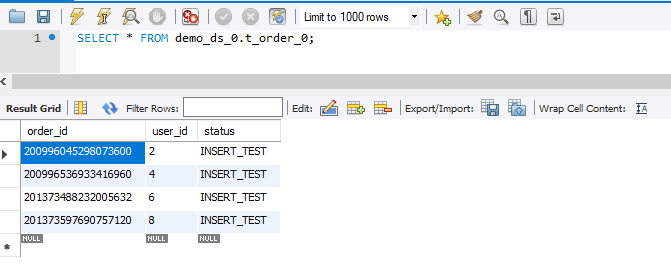
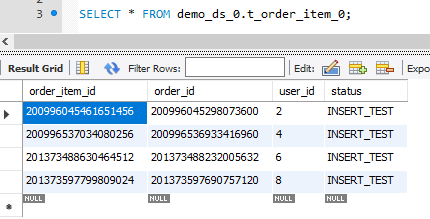
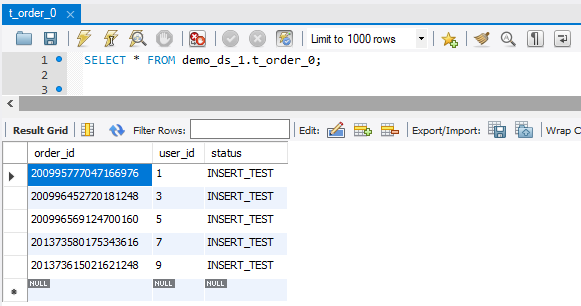
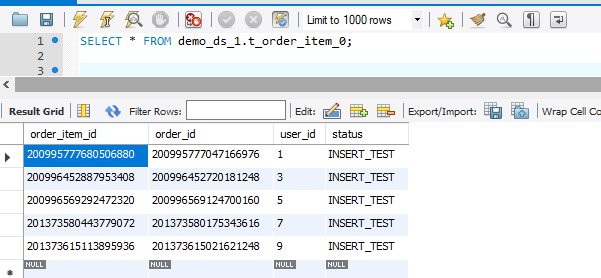
可以看到数据是按照规定的规则写到不同的库和表里了:

demo_ds_0
├── t_order_0 user_id为偶数 order_id为偶数
├── t_order_1 user_id为偶数 order_id为奇数
├── t_order_item_0 user_id为偶数 order_id为偶数
└── t_order_item_1 user_id为偶数 order_id为奇数
demo_ds_1
├── t_order_0 user_id为奇数 order_id为偶数
├── t_order_1 user_id为奇数 order_id为奇数
├── t_order_item_0 user_id为奇数 order_id为偶数
└── t_order_item_1 user_id为奇数 order_id为奇数

这里有个小问题,就是两个库的 t_order_1,t_order_item_1 表中均没有数据,数据分配并不均匀。这是因为Sharding-JDBC采用的默认的分布式自增主键是使用的snowflake算法实现的,说明可以参考sharding-jdbc官网:

http://shardingjdbc.io/docs_cn/01-start/faq/

image

关于这个问题,考虑修改分表策略为hash分片,或者稍微改造下snowflake 随机初始? 待研究完善…

SpringCloud微服务示例

发表于 2018-04-27 | 分类于 Spring Cloud

前言

本指南将帮助您学习微服务和微服务架构的基础知识。 我们也将开始着眼于使用Spring Cloud的微服务的基本实现。

我们将创建一些服务,并使用Eureka实现服务治理和Ribbon来实现客户端负载均衡。

在本系列文章中,我们将创建两个微服务:

  • Forex Service(外汇服务) - 简称为FS
  • Currency Conversion Service(货币转换服务) - 简称为CCS

外汇服务 Forex Service

外汇服务(Forex Service)是服务提供商。它提供各种货币的货币兑换值。我们假设它与外汇交易所通信并提供货币之间当前转换价值。

示例请求和响应如下所示:

GET to http://localhost:8000/currency-exchange/from/EUR/to/INR

1
2
3
4
5
6
7
{
id: 10002,
from: "EUR",
to: "INR",
conversionMultiple: 75,
port: 8000
}

上面的请求是EUR(欧元)兑换INR(印度卢比)的货币交换值。在响应中,转换倍数为75。

货币转换服务 Currency Conversion Service

货币兑换服务(Currency Conversion Service 简称CCS)可以将一种货币转换为另一种货币。它使用外汇服务获取当前货币兑换值。CCS是服务消费者。

示例请求和响应如下所示:

GET to http://localhost:8100/currency-converter/from/EUR/to/INR/quantity/10000

1
2
3
4
5
6
7
8
9
{
id: 10002,
from: "EUR",
to: "INR",
conversionMultiple: 75,
quantity: 10000,
totalCalculatedAmount: 750000,
port: 8000
}

上面的请求是计算10000 EUR(欧元)兑换INR(印度卢比)的货币的价值。兑换金额为750000 INR。

下图显示了CCS和FS之间的通信。

image

Eureka服务治理 和 Ribbon

基于负载,我们可以有多个货币转换(CCS)服务

image

和多个外汇服务(FS)

image

每个服务的实例数量可能会随时间而变化(动态扩展和缩减每个服务的实例数量)。下图显示了有5个外汇服务实例的特定实例。

image

在上述情况下需要发生的是负载应该在这5个实例之间均匀分配。

image

在本系列文章中,我们将使用Ribbon进行负载均衡,并且使用Eureka来注册所有的微服务。

实现服务的动态扩展和缩减有如下两个问题:

  • 货币转换服务(CCS)如何知道有多少个外汇服务(FS)处于活动状态?
  • 货币转换服务(CCS)如何在多个外汇服务(FS)活动实例之间分配负载?

因为我们希望这是动态的,所以我们不能在CSS中编码FS的URL。这就是我们为什么需要引入一个服务的注册和发现机制。

组件的所有实例(CCS和FS)都向Eureka命名服务器注册。当CSS需要调用FS时,它会向Eureka命名服务器询问活动实例。我们将使用Ribbon在FS不同实例之间进行客户端负载均衡。

下图显示了从CCS到FS请求时的序列图:

image

本Demo项目包括以下内容:

  • 创建一个外汇服务(FS) - 我们将基于Spring Boot Starter Web 和 Spring Boot Started JPA 创建一个简单的rest service。我们将使用JPA并连接到H2数据库。
  • 创建货币转换服务(CCS) - 我们将使用Feign创建一个简单的rest service来调用外汇服务(FS)
  • 使用Ribbon实现负载均衡
  • 使用Eureka实现服务注册和发现

测试

依次启动 Eureka 服务(spring-cloud-microservice-eureka)、两个外汇服务(springcloud-microservice-forex-servcie,端口分别是:8000,8001)以及货币转换服务:

image

从上图可以看到看到一个货币转换服务(CCS)实例和两个外汇服务(FS)微服务实例在Eureka命名服务器上注册。CCS的请求将通过Eureka由Ribbon分发给外汇服务(FS)的两个实例。

请求1:
Get to http://localhost:8100/currency-converter-feign/from/EUR/to/INR/quantity/10000

image

请求2:
Get to http://localhost:8100/currency-converter-feign/from/EUR/to/INR/quantity/10000

image

我们可以看到两个响应中的端口号是不同的。

代码已上传 GitHub

区块链技术简介

发表于 2018-04-24

什么是区块链

区块链本质上是一个去中心化的分布式账本数据库,是比特币的底层技术。

位于全球计算机节点,部分会作为区块链的“小账本”

所有的小账本按照一定的规则连在一起,形成区块链

每个账本发生的业务不同,但按照相同的规则同步合并信息,这样的体系就是区块链系统。

区块链的优势

A转钱给B -> 先记在一个小账本上 -> 通知所有的小账本信息更新 -> 各个账本都确认信息受信 -> 各个小账本信息同步 -> 交易完成

分布式去中心化

image

image

匿名性

image

区块链难以克服的缺点

效率问题

人才成本高 - 密码学,计算数学,人工智能

举例理解

中本聪算啥?六百多年前区块链项目就在中国落地了!| 财链社 文章对理解什么式区块链讲解的很形象,摘抄如下:

周末到了,张三准备约上几个好友出来打麻将,于是就打电话约了李四、王五、赵六组了个麻将局。
而张三想打麻将的想法就相当于创建一个区块,而他再以打电话点对点的形式通知了李四、王五、赵六这个动作就做到了“去中心化”的点对点传输。

于是张三、李四、王五、赵六就形成了共识,坐到了一起开始打麻将。四个人会分别摸13张随机分配的麻将,通过摸一张打一张的形式来将麻将规范化的排序来和牌。而这里面摸打的动作就可以理解为“挖矿”,四个人就是“矿工”,108张麻将就是哈希值。而胡牌就是碰撞出了正确的哈希值,就可以获得相应的筹码奖励,也就是所谓的比特币。

那么问题来了,为什么其他三个人都会主动给和牌的人奖励呢?那是因为这三个人都自动达成了共识,这人确实赢了,大家都记录了这笔账,想抵赖是不行的,不然以后传出去这人品不行,就没人再和他一起打麻将了,毕竟圈子很重要。

同时,在大家达成共识时,我们看不到任何中介或者第三方出来评判谁赢了,大家给赢得人的奖励也不需要通过第三方转交给他,都是直接点对点交易,这一过程就是去中心化。

四个人(矿工)各自记录了第一局的战绩,王五大胡自摸七小对,赵六杠了张三的幺鸡,记录完成后就生成了一个完整的区块,但要记住,这才只是第一局,在整个区块链上,这才仅仅是一个节点,如果那天一共打了20盘麻将,也就是20个节点(区块),20个区块连接在一起就形成了一个完整账本,这就是区块链。

因为这个账本每人都有一个,所以就是分布式账本,目的就是为了防止有人篡改记录,打到最后,谁输谁赢一目了然。

整个过程,将区块链技术体现得淋漓尽致。

参考文档

中本聪算啥?六百多年前区块链项目就在中国落地了!| 财链社
区块链-京东图书专题活动

微服务与Spring Cloud简介

发表于 2018-04-23 | 分类于 Spring Cloud

一、首先谈谈传统架构和微服务架构

传统的系统架构是单一架构模式。这种架构模式就是把应用整体打包部署,具体的样式依赖本身应用采用的语言,如果采用java语言,自然你会打包成war包,部署在Tomcat或者Jetty这样的应用服务器上,如果你使用spring boot还可以打包成jar包部署。其他还有Rails和Node.js应用以目录层次的形式打包。
image

微服务架构则是将单个的整体应用程序分割成更小的项目关联的独立的服务。一个服务通常实现一组独立的特性或功能,包含自己的业务逻辑和适配器。各个微服务之间的关联通过暴露api来实现。这些独立的微服务不需要部署在同一个虚拟机,同一个系统和同一个应用服务器中。

二、为什么需要微服务架构?

单一架构模式在项目初期很小的时候开发方便,测试方便,部署方便,运行良好。可是当应用随着时间的推进,加入的功能越来越多,最终会变得巨大,一个项目中很有可能数百万行的代码,互相之间繁琐的jar包。

1、 不再适用敏捷开发,过于复杂,任何开发者都不能够完全理解,修复漏洞和实现新功能变得困难和耗时。

2、 规模越大,启动时间越长,自然会拖慢开发进度,一个小功能的修改部署起来变得困难,必须重新部署整个应用。

3、 系统的不同的模块的需要不同的特定的虚拟机环境时,由于是整体应用,那么只能折中选择。

4、 任意模块的漏洞或者错误都会影响这个应用,降低系统的可靠性

5、 还有一个如果想整体应用采用新的技术,新的框架或者语言,那是不可能的。

微服务一词来自Martin Fowler的Microservices一文,微服务是一种架构风格,将单体应用划分为小型的服务单元,微服务使用HTTP的API进行资源访问与操作。

如果采用微服务架构模式,则可以解决单一架构模式带来的系统复杂性。主要包括以下几个好处:

1、 由于每个服务都是独立并且微小的,由单独的团队负责,仍然可以采用敏捷开发模式,自由的选择合适的技术,甚至可以重写老服务,当然都要遵守统一的API约定。

2、 每一个微服务都是独立部署的,可以进行快速迭代部署,根据各自服务需求选择合适的虚拟机和使用最匹配的服务资源要求的硬件。

3、 整体应用程序被分解成可管理的模块和服务,单个的服务可以更快的开发、更简单的理解和维护。

4、 一些需要进行负载均衡的服务可以部署在多个云虚拟机上,加入NGINX这样的负载均衡器在多个实例之间分发请求,这样不需要整个应用进行负载均衡了。

每个后端服务暴露一套REST API,大部分服务调用其他服务提供的API。每个服务都有自己的数据库模式,而不是共享单个数据库模式。尽管这会造成某些数据的冗余,但是对于微服务架构这个独立数据库模式是必要的,确保了独立服务之间的松散耦合。

以上介绍的微服务架构模式表面上类似于SOA,两种架构都包含一组服务。可以认为微服务架构是不包括Web服务规范(WS-)、企业服务总线(ESB)的SOA。基于微服务的应用倾向于使用更简单轻量级的协议,比如 REST 而不是 WS-。微服务自己实现类似 ESB 的功能并且拒绝 SOA 的其他部分,比如规范模式的概念。

(SOA架构侧重于将每个单体应用的服务集成到企业服务总线ESB上,而微服务做得更加彻底,强调将整个模块变成服务组件,微服务对模块的划分粒度可能会更细。)

image

image

三、微服务架构的不足

1、 微服务应用作为分布式系统带来了复杂性。当应用是整体应用程序时,模块之间调用都在应用之内,即使进行分布式部署,依然在应用内调用。可是微服务是多个独立的服务,当进行模块调用的时候,分布式将会麻烦。

2、 多个独立数据库,事务的实现更具挑战性。

3、 测试微服务变得复杂,当一个服务依赖另外一个服务时,测试时候需要另外一个服务的支持。

4、 部署基于微服务的应用也很复杂,整体应用程序部署只需要部署在一组相同的服务器上,在这些服务前面加入传统的负载均衡器即可。独立服务的不是讲变得复杂,需要更高的自动化形式。

四、总结

单体式的架构更适合轻量级的简单应用。如果你用它来开发复杂应用,那真的会很糟糕。微服务架构模式可以用来构建复杂应用,当然,这种架构模型也有自己的缺点和挑战。

五、Spring Cloud简介

Spring Cloud是一个集成了众多开源的框架,利用Spring Boot的开发便利性实现了服务治理、服务注册与发现、负载均衡、数据监控,REST API发布方式等,基本囊括了分布式框架所需要的所有功能。是一套易开放、易部署、易维护的分布式开发工具包。

参考文档

  • https://www.cnblogs.com/hongxf1990/p/6491014.html
  • 《疯狂Spring Cloud微服务架构实战》

利用Sentry追踪日志发现问题(expcetion-tracking-with-sentry)

发表于 2017-08-29 | 分类于 Java

概述

Open-source error tracking that helps developers monitor and fix crashes in real time. Iterate continuously. Boost efficiency. Improve user experience.

sentry是一个现代化的错误日志记录和聚合平台。支持几乎所有主流开发语言和平台, 并提供了现代化UI, 本文简单介绍一下使用sentry平台记录后台错误日志。

注册

访问https://sentry.io/signup/注册一个sentry账号。

创建Team,Project

用创建好的账号登录,创建Team和Project.

image

设置下语言和时区

image

集成到Spring Boot项目

参考https://github.com/pwielgolaski/sentry

1). pom.xml
增加raven-logback依赖

1
2
3
4
5
<dependency>
<groupId>net.kencochrane.raven</groupId>
<artifactId>raven-logback</artifactId>
<version>6.0.0</version>
</dependency>

2). logback.xml
增加sentry配置

1
2
3
4
5
6
7
8
9
10
11
12
13
14
15
16
17
18
19
<?xml version="1.0" encoding="UTF-8"?>
<configuration>
<include resource="org/springframework/boot/logging/logback/defaults.xml" />
<property name="LOG_FILE" value="${LOG_FILE:-${LOG_PATH:-${LOG_TEMP:-${java.io.tmpdir:-/tmp}}/}spring.log}"/>
<include resource="org/springframework/boot/logging/logback/console-appender.xml" />

<appender name="SENTRY" class="net.kencochrane.raven.logback.SentryAppender">
<dsn>YOUR_URL_PROVIDED_BY_SENTRY</dsn>
<filter class="ch.qos.logback.classic.filter.ThresholdFilter">
<level>WARN</level>
</filter>
</appender>

<root level="INFO">
<appender-ref ref="CONSOLE" />
<appender-ref ref="SENTRY" />
</root>

</configuration>

dsn这里配置项目的dsn地址,如下图所示:

image

3). 测试类

1
2
3
4
5
6
7
8
9
10
11
12
13
14
15
16
17
18
19
20
21
@SpringBootApplication
@RestController
public class SentryApplication {

private final static Logger logger = LoggerFactory.getLogger(SentryApplication.class);

public static void main(String[] args) {
SpringApplication.run(SentryApplication.class, args);
}

@RequestMapping(method = RequestMethod.GET)
public String generateErrors() {
logException(new NullPointerException("NPE"));
logException(new IllegalArgumentException("Illegal"));
return "Exceptions generated";
}

private void logException(Exception ex) {
logger.error("Logger message for " + ex.getClass().getSimpleName(), ex);
}
}

运行测试类,可以看到日志已经记录到sentry上去了。

image

点击问题可以查看问题详细:

image

点击[分享该事件]可以将分享该事件:

image

以上便是利用sentry记录分析错误日志基本功能。

Apache Shiro使用介绍

发表于 2017-02-16 | 分类于 Java

Shiro简介

  • Apache Shiro是Java的一个安全(权限)框架。
  • Shiro 可以非常容易的开发出足够好的应用,其不仅可以用在JavaSE环境,也可以用在JavaEE的环境。
  • Shiro可以完成:认证、授权、加密、会话管理、与Web集成、缓存等。
  • Shiro 官网:https://shiro.apache.org/
    image

功能简介

基本功能点如下图所示:
image

  • Authentication - 身份认证/登录,验证用户是不是拥有相应的身份。
  • Authorization - 授权,即权限验证,验证某个已认证的用户是否拥有某个权限;即判断用户是否能进行什么操作,如:验证某个用户是否拥有某个角色。或者细粒度的验证某个用户对某个资源是否具有某个权限。
  • Session Management - 会话管理,即用户登录后就是一次会话,在没有退出之前,它的偶有信息都在会话中;会话可以是普通JavaSE环境,也可以是Web环境的。
  • Cryptography - 加密,保护数据的安全性,如密码加密存储到数据库,而不是明文存储。
  • Web Support - Web支持,可以非常容易的集成到Web环境。
  • Concurrency - Shiro支持多线程应用的并发验证,即如在一个线程中开启另一个线程,能把权限自动传播过去。
  • Testing - 提供测试支持。
  • Caching - 缓存,比如用户登录后,其用户信息、拥有的角色/权限不必每次去查,这样可以提高效率。
  • “Run As” - 允许一个用户假装为另一个用户(如果他们允许)的身份进行访问。
  • Remember Me - 记住我,这个是非常常见的功能,即一次登录后,下次再来的话不用登录了。

Shiro架构(Shiro外部来看)

从外部来看Shiro,即从应用程序角度来观察如何使用Shiro完成工作:
image

  • Application Code - 实际上指的是我们的应用程序
  • Subject - 应用程序去访问Shiro的话,一定是Subject,这个是表示当前用户,就是说你有没有登录,是不是可以去访问某一个权限,Subject可以理解为一个“门面”
  • Security Manager - 就像一个大管家,管理着Shiro的各个组件,实际上Subject的背后就是这个Security Manager。
  • Realm - 当我们需要访问一些安全数据的时候,比如说获取用户信息,获取权限信息我们需要用到Realm,它相当于是一个Security Dao

Shiro架构(Shiro内部来看)

image

HelloWorld

1.创建一个Java Project, 取名为 “shiro-helloworld”,

image

2.在工程里面新建一个lib的文件夹,将所需的shiro相关jar包拷贝过来

image
将jar包加入Build Path

3.看shiro给我们提供的HelloWorld

Shiro source code 下载地址为:https://shiro.apache.org/download.html#latestSource
image
我们到shrio source code 的 samples/quickstart 目录下面

image

将这两个配置文件拷贝到我们的工程下面,

image

然后将Quickstart.java文件拷贝到项目中,
image
新建一个包 com.shiro.helloworld,将Quickstart.java文件拷入,拷入后,加入包的声明,
image

右键->Run As->Java Application,可以看到系统可以正常跑起来,
image

下面我们来解读一下这部分代码:

1
2
3
4
5
6
7
8
9
// The easiest way to create a Shiro SecurityManager with configured
// realms, users, roles and permissions is to use the simple INI config.
// We'll do that by using a factory that can ingest a .ini file and
// return a SecurityManager instance:

// Use the shiro.ini file at the root of the classpath
// (file: and url: prefixes load from files and urls respectively):
Factory<SecurityManager> factory = new IniSecurityManagerFactory("classpath:shiro.ini");
SecurityManager securityManager = factory.getInstance();

这段代码是指以一种最简单的方式-通过shiro.ini配置文件的方式来获取SecurityManager的一个实例.

shiro.ini文件里面配置了用户,用户密码,用户所有的角色,权限,这里仅仅是HelloWorld应用,实际中相关信息需要从数据库中获取。

1
2
3
4
5
6
7
// for this simple example quickstart, make the SecurityManager
// accessible as a JVM singleton. Most applications wouldn't do this
// and instead rely on their container configuration or web.xml for
// webapps. That is outside the scope of this simple quickstart, so
// we'll just do the bare minimum so you can continue to get a feel
// for things.
SecurityUtils.setSecurityManager(securityManager);

在这个简单的例子里,我们使SecurityManager在Java虚拟机里面变为单例模而且是可以访问的。
“Most applications wouldn’t do this”,大部分应用都不这样做,所以这段代码我们也不用太关心。

1
2
// get the currently executing user:
Subject currentUser = SecurityUtils.getSubject();

这段代码是获取当前的Subject

1
2
3
4
5
6
7
// Do some stuff with a Session (no need for a web or EJB container!!!)
Session session = currentUser.getSession();
session.setAttribute("someKey", "aValue");
String value = (String) session.getAttribute("someKey");
if (value.equals("aValue")) {
log.info("Retrieved the correct value! [" + value + "]");
}

测试使用Session,注意:即便是在没有Web的容器下也可以测试,在控制台输出中可以看出这个值是可以获取的,
image

1
2
3
4
5
6
7
8
9
10
11
12
13
14
15
16
17
18
19
// let's login the current user so we can check against roles and permissions:
if (!currentUser.isAuthenticated()) {
UsernamePasswordToken token = new UsernamePasswordToken("lonestarr", "vespa");
token.setRememberMe(true);
try {
currentUser.login(token);
} catch (UnknownAccountException uae) {
log.info("There is no user with username of " + token.getPrincipal());
} catch (IncorrectCredentialsException ice) {
log.info("Password for account " + token.getPrincipal() + " was incorrect!");
} catch (LockedAccountException lae) {
log.info("The account for username " + token.getPrincipal() + " is locked. " +
"Please contact your administrator to unlock it.");
}
// ... catch more exceptions here (maybe custom ones specific to your application?
catch (AuthenticationException ae) {
//unexpected condition? error?
}
}

测试当前的用户是否已经被认证,即是否已经登录,调用 currentUser.isAuthenticated()方法,这里是没有登录的,

UsernamePasswordToken token = new UsernamePasswordToken("lonestarr", "vespa"); 把用户名和密码封装为UsernamePasswordToken对象,

调用 currentUser.login(token); 执行登录。

那么我们能够登录成功吗? – 取决于shiro.ini这个配置文件中是否配置了lonestarr这个用户,并且配置的密码是vespa。

image

shiro.ini 里面有配置这个用户,用户密码也是一致的,所以可以成功登录。
image

从代码中可以看出,可能出现的异常有:

  • UnknownAccountException - 未知的账户,若没有指定的账户则shiro将会抛出这个异常;
  • IncorrectCredentialsException - 错误的凭证异常,若账户存在,但密码不匹配,则shiro会抛出IncorrectCredentialsException异常;
  • LockedAccountException - 用户被锁定异常;
  • AuthenticationException - 所有认证时异常的父类
1
2
3
4
5
6
//test a role:
if (currentUser.hasRole("schwartz")) {
log.info("May the Schwartz be with you!");
} else {
log.info("Hello, mere mortal.");
}

这段代码用于测试用户是否具有schwartz这个角色,查看shiro.ini配置文件
image
可以看到lonestarr这个用户时拥有schwartz这个角色的。

1
2
3
4
5
6
//test a typed permission (not instance-level)
if (currentUser.isPermitted("lightsaber:weild")) {
log.info("You may use a lightsaber ring. Use it wisely.");
} else {
log.info("Sorry, lightsaber rings are for schwartz masters only.");
}

这段代码用于测试用户是否具备某个行为。Role(角色)是一个抽象的概率,Rermission(权限)是具体的行为。查看shiro.ini配置文件:
image

可以看见用户lonestarr拥有schwartz这个角色,schwartz拥有lightsaber的权限。 * 是通配符,表示匹配任意字符。

1
2
3
4
5
6
7
//a (very powerful) Instance Level permission:
if (currentUser.isPermitted("winnebago:drive:eagle5")) {
log.info("You are permitted to 'drive' the winnebago with license plate (id) 'eagle5'. " +
"Here are the keys - have fun!");
} else {
log.info("Sorry, you aren't allowed to drive the 'eagle5' winnebago!");
}

同上,这段代码也是测试用户是否具备某个行为,不过这个比上面更具体(very powerful)。
image

1
2
# The 'goodguy' role is allowed to 'drive' (action) the winnebago (type) with
# license plate 'eagle5' (instance specific id)

winnebago - 表示的一个类型(type), drive - 表示一个具体的行为(action), eagle5 - 表示一个具体的Id。
比如字符串 user:delete:zhangsan, 表示具备删除张三这个用户的权限。

1
2
//all done - log out!
currentUser.logout();

最后,执行登出,程序结束。

nodejs+express+ejs简单示例

发表于 2017-02-15 | 分类于 nodejs

最近因为工作需要在学习Node.js,简单的搭建了一个nodejs+express+ejs示例,记录一下。

环境和知识准备:

环境搭建
Node.js的安装省略,网上有很多教程。

参考文档:
Node.js 教程 | 菜鸟教程 http://www.runoob.com/nodejs/nodejs-tutorial.html
Express - 基于 Node.js 平台的 web 应用开发框架 http://www.expressjs.com.cn/
EJS – Embedded JavaScript templates http://ejs.co/

本文参考 Use EJS to Template Your Node Application | Scotch https://scotch.io/tutorials/use-ejs-to-template-your-node-application 这篇文章搭建的示例,IDE使用的是Visual Studio Code https://code.visualstudio.com/。

文件结构

在磁盘上创建文件夹node-with-express-and-ejs,在该文件夹下面创建以下文件夹和文件,完成后的文件结构如下:

image

安装

打开package.json这个项目配置文件,添加对express和ejs的依赖

1
2
3
4
5
6
7
8
{
"name": "node-ejs",
"main": "server.js",
"dependencies": {
"ejs": "^1.0.0",
"express": "^4.6.1"
}
}

接下来使用npm install命令进行安装:

1
$ npm install

image

编辑server.js文件,增加如下代码:

1
2
3
4
5
6
7
8
9
10
11
12
13
14
15
16
17
18
19
20
21
22
// server.js
// load the things we need
var express = require('express');
var app = express();

// set the view engine to ejs
app.set('view engine', 'ejs');

// use res.render to load up an ejs view file

// index page
app.get('/', function(req, res) {
res.render('pages/index');
});

// about page
app.get('/about', function(req, res) {
res.render('pages/about');
});

app.listen(3000);
console.log('3000 is the magic port');

启动

使用 $ node server.js 命令启动服务

1
$ node server.js

启动成功后,我们就可以在浏览器中访问:http://127.0.0.1:3000/ 和 http://127.0.0.1:3000/about 了。

利用EJS Partials编写公用的模板文件

views/partials/head.ejs

1
2
3
4
5
6
7
8
9
10
<!-- views/partials/head.ejs -->

<meta charset="UTF-8">
<title>Super Awesome</title>

<!-- CSS (load bootstrap from a CDN) -->
<link rel="stylesheet" href="//maxcdn.bootstrapcdn.com/bootstrap/3.2.0/css/bootstrap.min.css">
<style>
body { padding-top:50px; }
</style>

views/partials/header.ejs

1
2
3
4
5
6
7
8
9
10
11
12
13
14
15
16
17
18
19
<!-- views/partials/header.ejs -->

<nav class="navbar navbar-default" role="navigation">
<div class="container-fluid">

<div class="navbar-header">
<a class="navbar-brand" href="#">
<span class="glyphicon glyphicon glyphicon-tree-deciduous"></span>
EJS Is Fun
</a>
</div>

<ul class="nav navbar-nav">
<li><a href="/">Home</a></li>
<li><a href="/about">About</a></li>
</ul>

</div>
</nav>

views/partials/footer.ejs

1
2
3
<!-- views/partials/footer.ejs -->

<p class="text-center text-muted">© Copyright 2014 The Awesome People</p>

使用include标签引入公用的模板

1
2
3
4
5
6
7
8
9
10
11
12
13
14
15
16
17
18
19
20
21
22
23
24
25
26
<!-- views/pages/index.ejs -->

<!DOCTYPE html>
<html lang="en">
<head>
<% include ../partials/head %>
</head>
<body class="container">

<header>
<% include ../partials/header %>
</header>

<main>
<div class="jumbotron">
<h1>This is great</h1>
<p>Welcome to templating using EJS</p>
</div>
</main>

<footer>
<% include ../partials/footer %>
</footer>

</body>
</html>

修改完成后,再次访问首页,页面如下所示:
image

修改about页面

1
2
3
4
5
6
7
8
9
10
11
12
13
14
15
16
17
18
19
20
21
22
23
24
25
26
27
28
29
30
31
32
33
34
35
36
37
38
39
<!-- views/pages/about.ejs -->

<!DOCTYPE html>
<html lang="en">
<head>
<% include ../partials/head %>
</head>
<body class="container">

<header>
<% include ../partials/header %>
</header>

<main>
<div class="row">
<div class="col-sm-8">

<div class="jumbotron">
<h1>This is great</h1>
<p>Welcome to templating using EJS</p>
</div>

</div>
<div class="col-sm-4">

<div class="well">
<h3>Look I'm A Sidebar!</h3>
</div>

</div>
</div>
</main>

<footer>
<% include ../partials/footer %>
</footer>

</body>
</html>

访问about页面:
image

下面我们看看如何传递数据到页面(实际生产环境中我们应该从数据库中获取数据):

打开server.js,修改app.get(‘/‘)这个路由,增加一些模拟数据:

1
2
3
4
5
6
7
8
9
10
11
12
13
14
15
16
// server.js

// index page
app.get('/', function(req, res) {
var drinks = [
{ name: 'Bloody Mary', drunkness: 3 },
{ name: 'Martini', drunkness: 5 },
{ name: 'Scotch', drunkness: 10 }
];
var tagline = "Any code of your own that you haven't looked at for six or more months might as well have been written by someone else.";

res.render('pages/index', {
drinks: drinks,
tagline: tagline
});
});

修改index.ejs文件,利用<%=%>标签(和JSP中的标签类似)来显示变量的数据:

1
2
3
4
5
<!-- views/pages/index.ejs -->
...
<h2>Variable</h2>
<p><%= tagline %></p>
...

使用 .forEach来遍历数据:

1
2
3
4
5
6
7
8
9
<!-- views/pages/index.ejs -->
...
<h2>Loop</h2>
<ul>
<% drinks.forEach(function(drink) { %>
<li><%= drink.name %> - <%= drink.drunkness %></li>
<% }); %>
</ul>
...

修改后的index.ejs文件如下:
image

再次访问首页,可以发现数据已经传递到页面了:
image

至此,一个简单的nodejs+express+ejs示例就完成了。

后记:代码编写过程中发现VSCode不支持ejs后缀的文件的语法高亮显示,解决方案如下:
参考文档:Add .EJS support or extend existing HTML to include .EJS https://github.com/Microsoft/vscode/issues/2853
image

修改完成后,重启VSCode,发现index.ejs文件里面的html也可以高亮显示如,如下所示:
image

Heritrix环境安装

发表于 2016-09-30 | 分类于 crawler

Heritrix is the Internet Archive’s open-source, extensible, web-scale, archival-quality web crawler project.

一、源码下载

访问GitHub地址:https://github.com/internetarchive/heritrix3

image

我这里采用Clone的方式,使用的IDE是IntelliJ IDEA

image

image

导入完成后的结果如下:
image

二、启动Heritrix

https://webarchive.jira.com/wiki/display/Heritrix/Running+Heritrix+3.0+and+3.1

尝试启动heritrix,heritrix内核使用jetty所以不需要依附tomcat或者其他web容器。
入口类是这个 org.archive.crawler.Heritrix,设置启动参数,如下所示:

image

右键 Run ‘Heritrix.main()’启动程序:

image

启动成功:
image

三、基于Web的用户界面

After Heritrix has been launched, the Web-based user interface (WUI) becomes accessible.
The URI to access the Web UI is typically
https://(heritrixhost):8443

打开浏览器,访问 https://localhost:8443/ ,输入用户名密码,admin,admin。

image

登录成功后的主控制台页如下所示:

image

四、运行第一个爬虫任务的快速指南

在主控制台页,新建一个名为’myJob’的Job,创建成功后的界面如下:

image

点击新创建的’myJob’的名称链接,进入到’myJob’管理界面,如下所示:

image

单击工具栏上的”Configuration”链接,进入配置文件的展示/编辑页面如下所示:

image

需要进行一些简单的配置,才能使得这个Job正常运行:
A. 将一个有效的值添加到 metadata.operatorContactUrl 属性,如下所示:

image

1)metadata.operatorContactUrl 你控制Heritrix的URL,一般是http://127.0.0.1
2)metadata.jobName 表示你的抓取名字,我们刚才创建的是myjob,那就修改为myjob
3)metadata.description 表示对这个抓取任务的简单描述,我们这里就描述为 firt crawl job

B. 接下来,修改爬虫的种子值 longerOverrides 的 元素, 这里设置你想抓取的种子.

image

C. 完善job信息和本机信息

image

修改完成后,点击左下角的’save changes’按钮,保存配置。

image

保存成功后,返回到’myJob’管理界面:

image

点击’build’按钮,进行build,Job is Ready
点击’Launch’按钮, Job is Active:PREPARING
点击’checkpoint’按钮, Job is Active:PAUSED
点击’unpause’按钮,运行Job,Job is Active:RUNNING

进入文件目录,我们可以看到文件保存的目录
D:\workspace\github\heritrix3\jobs\myjob\20160825031757\warcs 在不断的增大。

如果要看到每个抓取的页面,可以将配置文件的warcWriter这个bean的class改为:
org.archive.modules.writer.MirrorWriterProcessor,这样就下载的网页是以镜像文件的形式保存在,一般存放在项目根目录下的mirror目录下。

五、部署到Linux系统

export JAVA_OPTS=-Xmx1724M
./heritrix -a admin:admin -b 192.168.8.225

六、参考资料

Heritrix3.0教程(三) 开始抓取 http://guoyunsky.iteye.com/blog/1744456
搜索引擎搭建——Heritrix http://blog.wuzx.me/archives/368
Heritrix中的SURT和SurtPrefixedDecideRule .
http://cache.baiducontent.com/c?m=9f65cb4a8c8507ed4fece7631046893b4c4380146d96864968d4e414c4224615023dbfee3a715042889422301cf91e1ab9ab68332a0420b190ca8b4cc9fecf6879877d633047c00149990eafba07628166875b99ed59b0eeab78c4f8c5d2af02049b08532d97f1fb1a474a9d&p=8f769a4780d501f010bd9b7a0757&newp=8b2a971a878511a05ce7822a130a92695803ed603ed4d501298ffe0cc4241a1a1a3aecbf26221006d3c1786501af4e57edf63271340234f1f689df08d2ecce7e70d961&user=baidu&fm=sc&query=Heritrix+SurtPrefixedDecideRule&qid=97273cbc0000dbe4&p1=1

RE: [archive-crawler] Inserting information to MYSQL during crawl
https://groups.yahoo.com/neo/groups/archive-crawler/conversations/topics/508

写入HBase
https://github.com/OpenSourceMasters/hbase-writer

SURT+Rules
https://webarchive.jira.com/wiki/display/ARIH/SURT+Rules
https://webarchive.jira.com/wiki/display/ARIH/Expand+Scope+Rules

Heritrix3.0教程(五) 配置文件crawler-beans.cxml介绍
http://guoyunsky.iteye.com/blog/1744461

Heritrix 3.x API Guide
https://webarchive.jira.com/wiki/display/Heritrix/Heritrix+3.x+API+Guide#Heritrix3.xAPIGuide-LaunchJob

使用IntelliJ IDEA开发SpringMVC网站(八)log4jdbc-remix使用

发表于 2016-07-09 | 分类于 Java

在《使用IntelliJ IDEA开发SpringMVC网站(四)集成MyBatis》文章中讲解了使用Log4j来输出MyBatis执行的SQL语句,如下所示:

image

这里有一个缺点:占位符与参数是分开打印的,如果想要拷贝sql至客户端直接执行,需要自己拼凑sql。而log4jdbc是在jdbc层的一个日志框架,可以将占位符与参数全部合并在一起显示,方便直接拷贝sql在客户端直接执行,加快调试速度。

log4jdbc-remix 是 log4jdbc的一个扩展,安装配置过程如下:

1.加入依赖的Jar包

在pom.xml文件中增加如下内容:

1
2
3
4
5
6
7
8
9
10
11
12
13
<properties>
...
<log4jdbc_remix.version>0.2.7</log4jdbc_remix.version>
</properties>
<dependencies>
...
<!-- log4jdbc-remix -->
<dependency>
<groupId>org.lazyluke</groupId>
<artifactId>log4jdbc-remix</artifactId>
<version>${log4jdbc_remix.version}</version>
</dependency>
</dependencies>

2.Spring中配置

修改spring-mybatis.xml文件,配置如下所示:

1
2
3
4
5
6
7
8
9
10
11
12
13
14
15
16
17
18
19
20
21
22
<!--数据库连接池-->
<bean id="dataSourceSpied" class="com.alibaba.druid.pool.DruidDataSource" init-method="init" destroy-method="close">
<property name="url" value="${jdbc.url}" />
<property name="username" value="${jdbc.username}"/>
<property name="password" value="${jdbc.password}"/>
<!-- 配置初始化大小、最小、最大 -->
<property name="initialSize"><value>1</value></property>
<property name="maxActive"><value>20</value></property>
<property name="minIdle"><value>1</value></property>
<!-- 配置获取连接等待超时的时间 -->
<property name="maxWait"><value>60000</value></property>
<!-- 配置监控统计拦截的filters -->
<property name="filters"><value>stat</value></property>
<!-- 配置间隔多久才进行一次检测,检测需要关闭的空闲连接,单位是毫秒 -->
<property name="timeBetweenEvictionRunsMillis"><value>60000</value></property>
<!-- 配置一个连接在池中最小生存的时间,单位是毫秒 -->
<property name="minEvictableIdleTimeMillis"><value>300000</value></property>
</bean>

<bean id="dataSource" class="net.sf.log4jdbc.Log4jdbcProxyDataSource">
<constructor-arg ref="dataSourceSpied" />
</bean>

也可以格式化一下输出如下所示:

1
2
3
4
5
6
7
8
9
10
<bean id="dataSource" class="net.sf.log4jdbc.Log4jdbcProxyDataSource">
<constructor-arg ref="dataSourceSpied" />
<property name="logFormatter">
<bean class="net.sf.log4jdbc.tools.Log4JdbcCustomFormatter">
<property name="loggingType" value="MULTI_LINE" />
<property name="margin" value="19" />
<property name="sqlPrefix" value="SQL:::" />
</bean>
</property>
</bean>

3.log4j.properties配置

在log4j.properties文件里面增加如下内容:

1
2
3
4
5
6
7
8
9
10
11
12
13
14
15
16
17
18
19
20
21
22
23
##-------------log4jdbc 配置方式示例---------------##
#值设置方式 :如果关闭设置为OFF,如果开启设置为ON(默认debug级别)或(设置输出级别,输出器)
log4j.logger.jdbc.sqlonly=OFF
log4j.logger.jdbc.sqltiming=INFO,sql
log4j.logger.jdbc.audit=OFF
log4j.logger.jdbc.resultset=OFF
log4j.logger.jdbc.connection=OFF
log4j.logger.jdbc.resultsettable=INFO,sql

log4j.additivity.jdbc.sqlonly=false
log4j.additivity.jdbc.sqltiming=false
log4j.additivity.jdbc.audidt=false
log4j.additivity.jdbc.resultset=false
log4j.additivity.jdbc.connection=false
log4j.additivity.jdbc.resultsettable=false

! the appender used for the JDBC API layer call logging above, sql only
log4j.appender.sql=org.apache.log4j.FileAppender
log4j.appender.sql.File=D:/logs/sql.log
log4j.appender.sql.Append=false
log4j.appender.sql.layout=org.apache.log4j.PatternLayout
log4j.appender.sql.layout.ConversionPattern= %d{yyyy-MM-dd HH:mm:ss.SSS} %m%n%n
log4j.additivity.sql=false

配置完成,启动服务,出现了以下异常:

image

解决方案:注释掉 这行即可。再次启动服务,可以在指定的日志文件 log4j.appender.sql.File=D:/logs/sql.log 查看到打印出的SQL语句:

image

使用IntelliJ IDEA开发SpringMVC网站(七)添加REST功能

发表于 2016-07-08 | 分类于 Java

在上一篇《使用IntelliJ IDEA开发SpringMVC网站(六)利用mybatis-generator自动生成代码》文章中讲解了如何利用mybatis-generator自动生成代码,本文讲解一下添加REST功能。

rest(一种软件架构风格)

  REST即表述性状态传递(英文:Representational State Transfer,简称REST)是Roy Fielding博士在2000年他的博士论文中提出来的一种软件架构风格。它是一种针对网络应用的设计和开发方式,可以降低开发的复杂性,提高系统的可伸缩性。

  目前在三种主流的Web服务实现方案中,因为REST模式的Web服务与复杂的SOAP和XML-RPC对比来讲明显的更加简洁,越来越多的web服务开始采用REST风格设计和实现。

  为了帮助Spring开发人员使用REST架构模式,Spring3.0封装了对REST的良好支持。

REST基本原理

(以下内容摘自《Spring 实战 第3版》)
  当谈论REST时,有一种常见的错误就是将其视为“基于URL的Web服务”———将REST作为另一种类型的远程过程调用(Remote Procedure Call, RPC)机制,就像SOAP一样,只不过是通过简单的HTTP URL而不是SOAP的大量XML命名空间来触发。

  恰好相反,REST与RPC几乎没有任何关系。RPC是面向服务的,并关注于行为和动作;而REST是面向资源的,强调描述应用程序的事务和名词。

  此外,尽管URL在REST中起了关键作用,但他们仅仅是整体的一部分而已。为了理解REST是什么,我们将它的首字母缩写拆分为不同的组成部分。

  • 表述性(Representational)——REST资源实际上可以用各种形式来进行表述,包括XML、JSON(JavaScript Object Notation)甚至HTML-最适合资源使用者的任意形式。
  • 状态(State)——当使用REST的时候,我们更关注资源的状态而不是对资源采取的行为。
  • 转移(Transfer)——REST涉及转移资源数据,它以某一种表述性形式从一个应用转移到了一个应用。

  更简洁地讲,REST就是将资源的状态以最合适的形式从服务器端转移到客户端(或者反之)。

Spring是如何支持REST的

  Spring3对Spring MVC的一些增强功能为REST提供了良好的支持。现在,Spring支持以下方式来开发REST资源。

  • 控制器可以处理所有的HTTP方法,包含4个主要的REST方法:GET、PUT、DELETE以及POST。
  • 新的@PathVariable注解使得控制器能够处理参数化的URL(将变量输入作为URL的一部分)
  • Spring表单绑定JSP标签库的form:form标签以及新的HiddenHttpMethodFilter,使得通过HTML表单提交PUT和DELETE请求成为可能,即便在某些浏览器中不支持这些HTTP方法。
  • 通过使用Spring的视图和视图解析器,资源可以以各种形式进行表述,包括将模型数据表现为XML、JSON、Atom和RSS的新视图实现。
  • 可以使用新的ContentNegotiatingViewResolver来选择最适合客户端的表述。
  • 基于视图的渲染可以使用新的@ResponseBody注解和各种HTTPMethodConverter实现来达到。
  • 类似地,新的@ResponseBody注解以及HttpMethodConverter实现可以将传入的HTTP数据转化为传入控制器处理方法的Java对象。
  • RestTemplate简化了客户端对REST资源的使用。

编写面向资源的控制器

  编写Spring MVC控制器类的模型是相当灵活的。几乎所有签名的方法都可以用来处理Web请求。但是这种灵活性的一个副作用据说SPring MVC允许你开发出不符合RESTful资源的控制器。编写出的控制器很容易是RESTless的。

剖析RESTless的控制器

  我们先看一下RESTless控制器究竟长什么样子,这有助于我们理解RESTfult控制器。DisplayUserController就是一个RESTless的控制器,如下所示:

1
2
3
4
5
6
7
8
9
10
11
12
@Controller
@RequestMapping("/displayUser.htm")
public class DisplayUserController {
@Autowired
private UserService userService;

@RequestMapping(method = RequestMethod.GET)
public String displayUser(@RequestParam(required = false, defaultValue = "1") int id, Model model) {
model.addAttribute(userService.findById(id));
return "user/view";
}
}

  首先要关注的第一件事是这个类的名字。确实,它只是一个名字而已。但是,它准确表达了这个控制器是做什么的。第一个单词是Display——一个动词。这表明这个控制器是面向行为的,而不是面向资源的。

  注意类级别的@RequestMapping注解。它说明这个控制器会处理”displayUser.htm”的请求,这似乎表明这个控制器关注于展现User(这里通过类名可以得到确认)的特殊用例。另外,扩展名说明它只能以HTML的形式来展现列表。

  DisplayUserController的编写方式并没有严重的错误。但是,它并不是一个RESTful的控制器。它是面向行为的并关注于一个特殊的用例:以HTML的形式展现一个User对象的详细信息。

处理RESTful URL

  当开始使用REST的时候,很多人想到的第一件事通常是URL。毕竟,在REST中所有的事情都是通过URL完成的。
URL是统一资源定位符(uniform resource locator)的缩写,按照这个名字,URL本意是用于定位资源的。此外,所有的URL同时也都是URI或统一资源标识符(uniform resource identifier)。如果是这样的话,我们可以认为任何给定的URL不仅可以定位一个资源还可以用于标识一个资源。
不同于RESTless URL(http://localhost:8080/SpringMVCDemo/displayUser.htm?id=2), RESTful完成承认HTTP用于表示资源的。 例如:http://localhost:8080/SpringMVCDemo/users/2

  • http://localhost:8080 标识了域和端口。
  • http://localhost:8080/SpringMVCDemo 标识了应用程序的Servlet上下文。这个URL更具体了,它指明了运行在服务器上的一个应用程序。
  • http://localhost:8080/SpringMVCDemo/users 表明了一种资源,也就是SpringMVCDemo应用程序中User的对象列表
  • :http://localhost:8080/SpringMVCDemo/users/2 是最精确的URL,标识了一个特定的User资源

添加REST功能

关于REST需要讲解的知识很多,这里就不一一详细介绍了,下面我们直接用一个例子来看看Spring MVC对REST的支持吧。

例子达到的效果是,根据不同的URL返回不同的View:

http://localhost:8080/users/2 返回默认的视图(FreeMarker)

http://localhost:8080/users/2.json 返回JSON

http://localhost:8080/users/2.xml 返回XML

1.添加依赖
在pom.xml里面添加以下依赖:

1
2
3
4
5
6
7
8
9
10
11
12
13
14
15
16
17
18
19
20
21
22
23
24
25
26
27
28
29
30
31
32
33
34
<properties>
...
<jackson.version>2.7.5</jackson.version>
<jackson_mapper.version>1.9.13</jackson_mapper.version>
</properties>

<dependencies>
...
<!-- Needed for JSON View -->
<dependency>
<groupId>com.fasterxml.jackson.core</groupId>
<artifactId>jackson-core</artifactId>
<version>${jackson.version}</version>
</dependency>

<dependency>
<groupId>com.fasterxml.jackson.core</groupId>
<artifactId>jackson-databind</artifactId>
<version>${jackson.version}</version>
</dependency>

<dependency>
<groupId>org.codehaus.jackson</groupId>
<artifactId>jackson-mapper-asl</artifactId>
<version>${jackson_mapper.version}</version>
</dependency>

<!-- Needed for XML View (with JAXB2) -->
<dependency>
<groupId>org.springframework</groupId>
<artifactId>spring-oxm</artifactId>
<version>${spring.version}</version>
</dependency>
</dependencies>

使用JAXB2.0实现OXM

OXM是Object XML Mapping的缩写,它是一个O/M-mapper,将java对象映射成XML数据,或者将XML数据映射成java对象。我们把对象与关系数据库之间的映射称为ORM, 所以也把对象与XML之间的映射称为OXM。

JAXB(Java Architecture for XML Binding)是一种特殊的序列化/反序列化工具。它可以使XML数据以Java Objects的形式直接应用于Java程序之中,使Java Objects与XML数据之间的转换成为可能。在JAXB中将Java Objects到XML数据的转换称为marshal;XML数据到Java Objects的转换称为unmarshal。原来JAXB是Java EE的一部分,在JDK6中,SUN将其放到了Java SE中,这也是SUN的一贯做法。JDK6中自带的这个JAXB版本是2.0, 比起1.0(JSR 31)来,JAXB2(JSR 222)用JDK5的新特性Annotation来标识要作绑定的类和属性等,这就极大简化了开发的工作量。

更多介绍参考:http://my.oschina.net/zzx0421/blog/98186

2.Model
修改User,使用@XmlRootElement JAXB注解,@XmlRootElement 将一个Java类映射为一段XML的根节点,之后我们可以使用这个Model展示XML结构的数据。

1
2
3
4
5
6
7
8
9
10
11
12
13
14
15
16
17
18
19
20
21
22
23
24
25
26
27
28
29
30
31
32
33
34
35
36
37
38
package com.springmvcdemo.model;

import javax.xml.bind.annotation.XmlRootElement;

@XmlRootElement
public class User {

private int id;
private String age;
private String userName;
public User(){
super();
}
public int getId() {
return id;
}
public void setId(int id) {
this.id = id;
}
public String getAge() {
return age;
}
public void setAge(String age) {
this.age = age;
}
public String getUserName() {
return userName;
}
public void setUserName(String userName) {
this.userName = userName;
}
public User(int id, String age, String userName) {
super();
this.id = id;
this.age = age;
this.userName = userName;
}
}

3.JSON和XML视图

若要输出 JSON 和 XML 视图,你不需要做任何额外的工作,Spring MVC 将自动处理转换.

4.Freemarker View
一个Freemarker View用来展示查询的User数据.
File: /WEB-INF/views/user/view.ftl

1
2
3
4
5
6
7
8
9
10
11
12
13
14
15
16
17
18
19
20
<!DOCTYPE html> <!-- 使用 HTML5 doctype,不区分大小写 -->
<html lang="zh-cmn-Hans"> <!-- 更加标准的 lang 属性写法 -->
<head>
<!-- 声明文档使用的字符编码 -->
<meta charset='utf-8'>
<!-- 优先使用 IE 最新版本和 Chrome -->
<meta http-equiv="X-UA-Compatible" content="IE=edge,chrome=1"/>

<title></title>
</head>

<body>
<h1>Spring @MVC ContentNegotiatingViewResolver</h1>

<b>User ID :</b> ${user.id} <br/>
<b>User Age :</b> ${user.age} <br />
<b>User Name :</b> ${user.userName}


</body>

5.Controller

新建一个UserController,如下所示:

1
2
3
4
5
6
7
8
9
10
11
12
13
14
15
16
17
18
19
20
21
22
23
24
25
26
27
28
29
30
31
32
33
34
35
36
37
38
39
40
41
42
43
44
45
46
package com.springmvcdemo.controller;


import com.springmvcdemo.service.UserService;
import org.springframework.beans.factory.annotation.Autowired;
import org.springframework.http.HttpStatus;
import org.springframework.stereotype.Controller;
import org.springframework.ui.Model;
import org.springframework.web.bind.annotation.*;


@Controller
@RequestMapping("/users")
public class UserController {
@Autowired
private UserService userService;

@RequestMapping(value = "/{id}", method = RequestMethod.GET)
@ResponseStatus(HttpStatus.OK)
public String getUser(@PathVariable("id") int id, Model model) {
model.addAttribute(userService.findById(id));
return "user/view";
}

/*
@RequestMapping(value = "/{id}", method = RequestMethod.PUT)
@ResponseStatus(HttpStatus.NO_CONTENT)
public void putUser(@PathVariable("id") int id, User user) {
userService.update(user);
}

@RequestMapping(value = "/{id}", method = RequestMethod.DELETE)
@ResponseStatus(HttpStatus.NO_CONTENT)
public void deleteUser(@PathVariable("id") int id) {
userService.deleteById(id);
}

@RequestMapping(method = RequestMethod.POST)
@ResponseStatus(HttpStatus.CREATED)
public @ResponseBody User createUser(User user, HttpServletRequest result, HttpServletResponse response) {
userService.insert(user);
response.setHeader("Location", "/users/" + user.getId());
return user;
}
*/
}

6.ContentNegotiatingViewResolver

在面向人类访问的Web应用程序中,选择的视图通常来讲都会渲染为HTML。视图解决方案是个简单的活动,如果根据视图名匹配上了视图,那这就是我们要用的视图了,当要讲视图名解析为能够产生资源表述的视图时,我们就需要另外一个维度需要考虑了,视图不仅要匹配视图名,而且选择的视图要适合客户端。如果客户端想要JSON,那么渲染HTML的视图就不行了——尽管视图名可能匹配。

Spring的ContentNegotiatingViewResolver是一个特殊的视图解析器,它考虑到了客户端所需要的内容类型。就像其他的视图解析器一样,它要作为一个bean配置在Spring应用上下文里。

在spring-mvc.xml里面增加如下内容:

1
2
3
4
5
6
7
8
9
10
11
12
13
14
15
16
17
18
19
20
21
22
23
24
25
26
27
28
29
30
31
32
33
34
35
36
37
<!-- ContentNegotiatingViewResolver -->
<bean class="org.springframework.web.servlet.view.ContentNegotiatingViewResolver">
<property name="contentNegotiationManager">
<bean class="org.springframework.web.accept.ContentNegotiationManagerFactoryBean">
<property name="defaultContentType" value="text/html"/>
<property name="mediaTypes">
<map>
<entry key="json" value="application/json"/>
<entry key="xml" value="application/xml"/>
<entry key="html" value="text/html"/>
</map>
</property>
</bean>
</property>

<property name="defaultViews">
<list>
<!-- JSON View -->
<bean
class="org.springframework.web.servlet.view.json.MappingJackson2JsonView">
</bean>

<!-- JAXB XML View -->
<bean class="org.springframework.web.servlet.view.xml.MarshallingView">
<constructor-arg>
<bean class="org.springframework.oxm.jaxb.Jaxb2Marshaller">
<property name="classesToBeBound">
<list>
<value>com.springmvcdemo.model.User</value>
</list>
</property>
</bean>
</constructor-arg>
</bean>
</list>
</property>
</bean>

7.Demo

启动服务,

http://localhost:8080/users/2.xml 返回xml视图:

image

http://localhost:8080/users/2.json 返回json视图:

image

http://localhost:8080/users/2 返回默认视图(html):

image

(代码已提交到GitHub:https://github.com/jasonli822/MySpringMvcFrame)

123
Jason Li

Jason Li

看清现实,心怀梦想,幽默面对。

26 日志
5 分类
27 标签
GitHub E-Mail
© 2018 Jason Li
由 Hexo 强力驱动
|
主题 — NexT.Pisces v5.1.4